What to Expect During a Retaining Wall Build (LA Project Walk-Through)
A day-by-day overview of an LA retaining wall project — site prep, footing, wall, drainage, backfill, and final inspection.

Our team at Ridgeline Outdoor Living knows that a retaining wall project is part civil engineering and landscape construction. This process follows a predictable sequence with clear milestones for any property.
A well-built structure actively manages runoff and supports drought-tolerant landscaping. We make sure a good project manager keeps you in the loop throughout the entire timeline.
You need to know exactly what happens before the heavy machinery arrives. The goal is to show you a realistic what to expect retaining wall build scenario from start to finish.
Our experts will look at the data, explain what it means, and outline the exact steps involved.
Proper planning protects your landscape and conserves precious water. Let’s explore a few practical ways to prepare for this construction.
Stage 1: Pre-construction (4-10 weeks)
Our design process begins long before any heavy equipment hits your site. The city must approve the engineering plans to ensure the structure is safe. The Los Angeles Department of Building and Safety requires a grading permit for excavations over 50 cubic yards.
We handle the paperwork to keep the retaining wall timeline moving smoothly. Regular residential plan checks take 15 to 30 business days on average. Here is what happens during this initial phase:
- Design and engineering: Structural drawings are prepared, and a geotech report is completed.
- Permit submittal: Drawings are filed at Pasadena B&S, LADBS, or the relevant city desk.
- Plan check: The city desk reviews the plans and requests revisions if needed.
- Permit pull: The final permit is issued, making the site ready for construction.
- Material ordering: Block, rebar, concrete, and drainage components are ordered.
Our timeline for non-permitted walls under four feet is much shorter. Design and material ordering for small projects take just one to three weeks. You can start planning the planting layout during this quiet period.
Stage 2: Site prep and excavation (1-3 days)
Our crew starts by clearing the designated area and digging the foundational trench. Existing planting, hardscape, or fencing at the wall location is removed or saved if specified. Excavation goes 18 to 36 inches deep depending on the engineering requirements.
We manage the heavy lifting carefully to protect your existing property features. A single cubic yard of dry soil weighs roughly 2,000 pounds. Standard dump trucks haul 10 to 12 cubic yards per trip.
Our operators stage the soil strategically or haul it away immediately. Advanced hillside projects involve small excavators working in tight quarters. Some inaccessible areas must be entirely hand-dug to prevent property damage.
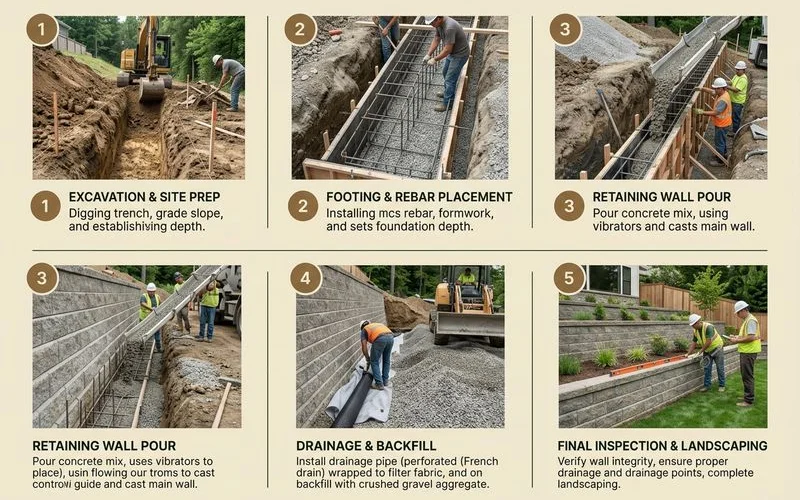
Stage 3: Footing pour (1-2 days)
Our foundation work provides the necessary structural support for the entire project. Wooden forms are built first, and a steel rebar cage is tied into place. The concrete poured must be rated at 3,000 PSI to handle immense hillside pressure.
We coordinate with the city inspector to confirm rebar placement before the pour. This mandatory inspection ensures permit-required walls meet strict safety standards. The poured concrete needs five to seven days to cure before wall construction begins.
Our crew typically pivots to other site work during this waiting period. Workers might move to another property temporarily while the foundation hardens. Patience at this stage prevents catastrophic structural failures later.
Stage 4: Wall stem construction (3-10 days)
Our masons build the vertical face of the structure during this active phase. The specific retaining wall construction process varies wildly based on the material chosen. Each structural system has its own unique rhythm and installation requirements.
We typically see a 40-foot-long, 6-foot-tall wall take five to eight working days. This timeframe starts from the footing cure and ends at wall completion. Your choice of materials dictates both the project budget and the final aesthetic.
Common Wall Systems Compared
Our design team helps you select the best option from these standard systems. You can compare the most common applications in the chart below. Different yards require different structural approaches.
| System Type | Construction Method | Best Application |
|---|---|---|
| Segmental blocks | Stacked in courses with geogrid mesh. | Curved walls and quick installations. |
| CMU blocks | Laid in mortar with rebar, filled with grout. | Highly engineered hillside terraces. |
| Poured concrete | Custom forms built, concrete poured in lifts. | Modern aesthetics and maximum strength. |
Stage 5: Drainage installation (1-2 days)
Our strict drainage standards prevent hydrostatic water pressure from destroying your investment. This critical step determines whether the structure lasts 50 years or fails in 10. The trapped water must have a clear path to escape from the soil.
We install a perforated French drain pipe directly at the toe of the footing. This pipe sits inside a graded envelope of 3/4-inch clean crushed stone. A layer of geotextile fabric wraps the gravel to separate it from the native soil.
Our setup behind the wall includes several critical components:
- French drain at the toe in a graded gravel envelope.
- Geotextile fabric wrapping the gravel.
- Weep holes spaced regularly through the wall face.
- Discharge routed to a daylight exit, dry well, or street curb.
These features keep mud from clogging the drainage system over time. Proper discharge routing prevents water from pooling in your yard.
Stage 6: Backfill (1-3 days)
Our machinery carefully returns soil to the space behind the finished blocks. This dirt is filled and compacted in precise layers called lifts. Each horizontal lift is limited to a maximum thickness of 8 to 12 inches.
We mechanically compact the dirt between every single layer. Engineers in California require this material to reach 90 to 95 percent of the Modified Proctor density standard. The compaction work is slow, heavy, and highly methodical.
Our strict adherence to these density limits protects your property from sinkholes. Dumping bulk fill without compacting it in shallow lifts is a massive mistake. This common shortcut is exactly what causes older walls to lean and fail.
Stage 7: Cap, finish, and inspection (1-3 days)
Our finishing touches give the project its final polished appearance. Wall caps are securely installed using construction adhesive or mortar. These decorative caps can be segmental blocks, poured concrete, or natural stone.
We apply any specified face finishes like stucco or stone veneer at this time. The upper bench receives a final surface grading to direct rainfall appropriately. Final cleanup and access path restoration happen right before the city official arrives.
Our project manager schedules the LADBS inspector for the final site visit. The structural permit formally closes once they approve the workmanship. You can finally start using your newly secured yard space.
Stage 8: Planting and integration (varies)
Our landscaping experts take over once the hardscape is officially complete. Most hillside projects include immediate planting to stabilize the fresh topsoil. Drought-tolerant slope planting is absolutely essential for Southern California properties.
We route highly efficient drip irrigation directly through the structural drainage layout. Drip systems operate at 90 percent efficiency by applying water straight to the roots. Traditional spray sprinklers only manage 65 to 75 percent efficiency by comparison.
Our targeted watering approach saves the average homeowner up to 3,000 gallons per month. You can enhance this efficiency by choosing the right native species. The best plants for secondary erosion control include:
- California Lilac: Thrives in controlled conditions with deep roots.
- Manzanita: Offers excellent coverage and drought resistance.
- Agave: Provides structural beauty with minimal water needs.
We blend the rigid concrete walls with soft, living textures perfectly. Your yard becomes a cohesive, sustainable environment. The finished landscape requires minimal maintenance going forward.
Total timeline by project size
Our scheduling department maps out every phase before breaking ground. Weather conditions and permit speeds create slight variations in these estimates. The data below shows a realistic expectation for different scopes of work.
We update these averages constantly based on recent local completions. You can use this chart to plan your seasonal backyard renovations. Larger estates naturally require a longer commitment.
| Project Scope | On-site Construction Days | Total Duration (Including Permits) |
|---|---|---|
| Single short segmental terrace (under 4 ft) | 4-6 days | 2-3 weeks |
| Single engineered wall (4-6 ft) | 8-14 days | 8-14 weeks |
| Multi-wall hillside terracing | 15-30 days | 12-20 weeks |
| Estate-scale stone-faced engineered wall | 30+ days | 16-24 weeks |
What can extend the timeline
Our contracts plan for the unexpected, but certain variables remain outside our control. The permitting process is often the biggest hurdle. Projects in Coastal Zones like Malibu require a California Coastal Commission review.
We see this specific regulatory step add three to six months to the schedule. Other common delays involve seasonal weather and hidden site conditions. You can review the list of common disruptions below:
- Permit delays: Holiday seasons and complex hillside reviews slow down city approvals.
- Plan-check resubmissions: The city may require structural design changes.
- Weather: Heavy rain stops all concrete pouring and soil compaction work.
- Discovery: Unexpected soil conditions or undocumented utilities require rapid adjustments.
- Change orders: Mid-project design changes requested by the homeowner require new materials.
Our team knows that understanding the what to expect retaining wall build process reduces stress. The right preparation saves water, protects your landscape, and prevents costly delays.
For more context on the permit side, see retaining wall permits in LA. We always recommend reviewing the local codes carefully before starting any earthwork.
For installation discipline that delivers on the engineering, see Ridgeline’s retaining walls service. Your property deserves a structural solution that will last for decades.
Frequently Asked Questions
How long does a retaining wall project take?
Will I be able to use my yard during construction?
What happens if it rains during construction?
Have questions about a project of your own?
A free on-site consultation, a phased budget tier, and a master plan that fits your property and your goals.