Paver Patio Installation Timeline (Day-by-Day in LA)
A realistic day-by-day timeline for paver patio installation in Los Angeles, including permit lead time, base prep, install, and finish work.
We understand that water conservation is a top priority for California homeowners planning a landscape upgrade. A beautiful outdoor space should capture rainwater rather than send it down the storm drain. Ridgeline Outdoor Living was founded to provide exceptional hardscaping services that customers can truly rely on.
Our team approaches every paver patio installation timeline with drought resilience in mind. Planning a permanent patio structure takes more than a free weekend.
We will walk you through the exact six stages of a standard and permeable installation, including local permit expectations and finish work.
Pre-construction (2 to 6 weeks)
Before shovels hit the dirt, the pre-construction phase takes two to six weeks for design approval and city permits. We handle this administrative work early to prevent mid-project delays. Local regulations strictly dictate the pacing of this stage.
Getting a regular plan check approved by the Los Angeles Department of Building and Safety (LADBS) for a residential hardscape project can take four to twelve weeks in 2026. This timeline applies heavily if you are adding complex retaining walls or extensive drainage systems. Our designers focus on getting these elements finalized immediately. The exact requirements must be met before any crew arrives on the property.
- Design sign-off (1 to 2 weeks): This phase covers the final layout, paver brand, pattern choice, and edge details.
- Material ordering (1 to 2 weeks): Project managers order pavers from a regional warehouse to ensure availability.
- Permit submittal (4 to 12 weeks): The city requires this step, specifically through Pasadena B&S or LADBS.
- Utility marking (2 working days): California law requires contacting 811 DigAlert two full working days before excavation begins.
Day 1: Demolition and excavation
We start by ripping out the existing concrete, lawn, or gravel. This phase typically takes one full day for an average 400-square-foot patio.
The required depth changes significantly based on your water conservation goals. A standard patio requires an 8 to 10-inch excavation depth to reach the sub-base. A permeable system designed to capture rainwater requires digging 12 to 24 inches deep to create an underground retention reservoir.
Our crews haul the excavated soil off the site immediately. Removing dirt in the Los Angeles area costs roughly $140 to $230 per cubic yard in 2026, making precise volume calculations crucial for your budget.
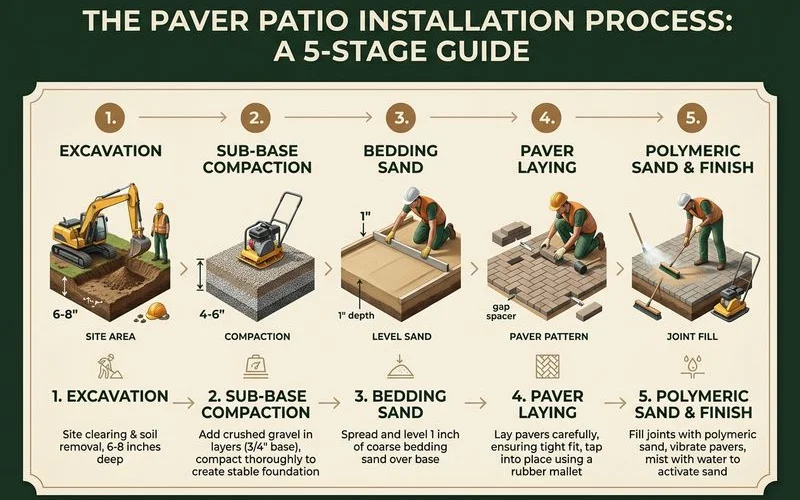
Day 2 to 3: Sub-base in compacted lifts
Our crew spends the second and third days building a structural foundation. A solid sub-base is the slow, careful work that distinguishes a twenty-year patio from a three-year patio.
The materials depend entirely on the environmental goals of the property:
- Standard base: Uses a dense aggregate base applied in 1 to 2-inch lifts. Each layer gets multiple passes with a mechanical plate compactor over a geotextile fabric.
- Permeable reservoir: Uses open-graded ASTM No. 2 stone at the bottom, topped with a layer of No. 57 stone. These larger stones create empty pockets that store rainwater until it absorbs naturally into the aquifer.
Day 4: Edge restraints and bedding sand
We pin down plastic or aluminum edge restraints along every perimeter border. This critical step prevents the heavy stones from spreading outward over time.
The bedding layer provides a smooth leveling course for the new surface. The materials vary based on the system:
- Standard design: The team spreads a 1-inch layer of bedding sand over the compacted base and screeds it perfectly flat to grade.
- Water-wise design: Installers replace the sand with a 1.5 to 2-inch layer of clean, crushed ASTM No. 8 stone, ensuring surface water drains instantly into the basin below.
Day 5 to 7: Paver laying
Our installers place each individual unit by hand to match your chosen design. A 400-square-foot space with simple geometry generally takes two to three crew days.
Complex patterns and sweeping curves require exact cuts around drains, trees, and hardscape transitions, which adds time to the job. Permeable Interlocking Concrete Pavements (PICP) utilize wider spacer bars to keep the joints open. These built-in gaps guarantee water flows freely between the stones rather than pooling on the surface.
To give you an idea of the design options, common layouts include:
- Herringbone: Offers the highest structural interlock for vehicle loads.
- Running Bond: Creates clean, linear sightlines perfect for modern homes.
- Ashlar: Uses multiple stone sizes for a randomized, natural appearance.
Day 7 to 8: Plate-compaction and polymeric sand
We run a plate compactor equipped with a protective rubber pad over the finished surface. This vibration forces the pavers tightly into the bedding layer without scratching the finish.
The joint filling process is the final functional step to lock the system together.
- Standard patios: Our crew sweeps polymeric sand into the joints, cleans the surface, and mists water to activate the binding agents.
- Drought-friendly systems: The installation team sweeps clean, crushed aggregate, typically ASTM No. 8, 89, or 9 stone, into the expanded gaps to keep the patio fully porous.
Day 8 to 10: Finish and walk-through
Our team focuses on the final clean-up and landscaping details during the last two days. The crew secures all edge transitions to the surrounding planting beds or existing hardscape.
A formal walk-through with the homeowner marks the completion of the physical labor. A written workmanship warranty is handed over during this meeting to guarantee the long-term quality of the installation.
Total timelines by project size
We use historical data to project accurate schedules for different property sizes. The table below outlines how long a paver install takes based on the footprint and system type.
| Project Size | Standard On-Site Days | Permeable System Days | Total Project Timeline (with permit) |
|---|---|---|---|
| Small patio (under 300 sq ft) | 4 to 5 days | 5 to 6 days | 4 to 8 weeks |
| Standard patio (300 to 800 sq ft) | 6 to 10 days | 8 to 12 days | 6 to 10 weeks |
| Large patio with seat walls (800 to 1500 sq ft) | 10 to 15 days | 12 to 18 days | 8 to 12 weeks |
| Multi-level and hardscape integration | 15 to 25 days | 18 to 28 days | 10 to 16 weeks |
What can extend the paver patio installation timeline
We build realistic buffers into every schedule because outdoor construction is inherently unpredictable. Recognizing these factors early keeps expectations grounded.
Several common issues can pause momentum on the job site:
- Permit delays: Complex submittals or holiday seasons slow down municipal review times.
- Weather conditions: Rain completely stops base preparation. The crew will not lay stones on a wet, compromised base.
- Underground discoveries: Finding undocumented utilities, hidden tree roots, or poor soil conditions requires immediate adjustments.
- Expired utility tickets: An 811 DigAlert ticket remains valid in California for exactly 28 calendar days. Delays might require a mandatory two-day wait for a renewal.
- Change orders: Mid-project design changes, like adding seat walls or expanding the footprint, extend the completion date.
If you are still mapping out your project, our guide on best Pavers for the Los Angeles Climate covers a related angle that pairs well with this topic.
What makes a smooth install
We rely on a strict preparation routine to keep jobs moving efficiently. Your direct involvement during the early stages makes the biggest difference in the final schedule.
Having the final design and material selection signed off before permit submittal prevents costly revisions. Site managers must confirm access for heavy delivery trucks and dumpsters early in the process. The 811 DigAlert team needs to mark existing utilities clearly before any digging starts.
Every Ridgeline paver patio project runs on this checklist. Your paver patio installation timeline remains honest, our staff pulls the permits, and the work follows ICPI standards from day one. Contact our team today to start planning your drought-friendly outdoor space.
Frequently Asked Questions
How long does a typical paver patio install take?
How long is the permit lead time?
Do I need to be home during the work?
Have questions about a project of your own?
A free on-site consultation, a phased budget tier, and a master plan that fits your property and your goals.