Artificial Turf Installation: Base Prep and Step-by-Step Process
Step-by-step artificial turf installation: excavation, sub-base, geotextile, edge restraints, infill, and seam work. Why base prep separates premium from cheap.
You know how frustrating it is to see a newly installed artificial lawn develop ripples and sunken spots after just one rainy season.
This failure almost always happens directly underneath the green surface.
We founded Ridgeline Outdoor Living with a simple mission: to provide exceptional landscaping and hardscaping services that customers can truly rely on. The UV-stable fiber and proper seams matter immensely. A properly compacted foundation is the actual dividing line between a lawn that lasts fifteen years and one that fails in twelve months.
We will walk through the exact artificial turf installation process so you know what to look for on the jobsite. Let’s look at the field data and explore a few practical ways to respond. This gives you a clear roadmap for success.
Step 1: Demolition and excavation
We always start by assessing the native soil profile before removing the existing lawn. Standard residential excavation goes down about 3 to 4 inches below the finish grade. California properties with heavy clay soils require a completely different approach to prevent the shrink-swell cycle from ruining the base.
Our crews excavate 6 to 8 inches deep when working over these expansive soils. This extra depth prevents the ground from heaving your new lawn upward during winter rains. Trees and large root masses also need careful assessment.
Pro Tip: Never lay artificial turf directly over aggressive roots from species like Sweet Gum or Chinese Pistache, as they will eventually buckle the surface.
We recommend leaving the native soil untouched around a mature tree’s drip line. A 2026 review of the SoCal Water$mart Rebate Program shows that homeowners can receive up to $5 per square foot for removing natural water-intensive grass. This financial incentive makes the demolition phase highly rewarding for drought-conscious residents.
Step 2: Sub-base aggregate in compacted lifts
We build the structural layer using a Class II road base or a 3/8ths angular bluestone aggregate. This material is laid down in 1 to 2 inch lifts. A heavy-duty plate compactor, such as a Wacker Neuson model, presses each lift into a solid slab.
Our standard total compacted depth hits 3 to 4 inches for foot traffic, but vehicle-adjacent edges need at least 6 inches. Cheap contractors will dump one thick lift and lazily run over it once. This shortcut settles unevenly and creates a wavy surface within the first twelve months.
We require the base to pass a strict “no footprint” test under the weight of an adult before any green material goes down.
- The surface should feel completely rigid like concrete.
- Achieving 95 percent Proctor density prevents future sinking.
- Proper compaction maintains tiny channels for optimal water drainage.
This strict testing shows exactly how artificial turf is installed correctly over a reliable foundation.
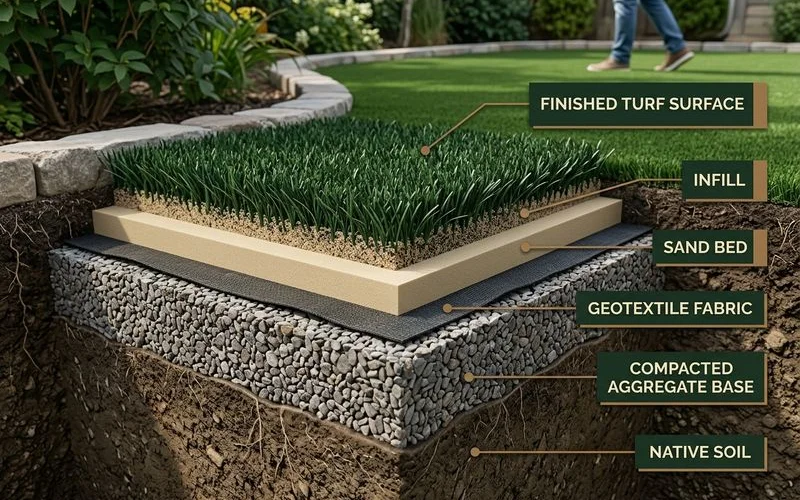
Step 3: Geotextile fabric
Our artificial turf installation process always includes a commercial-grade barrier between the compacted base and native dirt. A non-woven geotextile fabric stops fine native soil particles from migrating upward. It also stops the heavy gravel base from sinking into soft mud over time.
We specifically use a 4 oz non-woven needle-punched polypropylene fabric for this layer.
| Fabric Type | Water Flow Rate | Best Application |
|---|---|---|
| 4 oz Non-Woven | 100 to 140 GPM | Optimal drainage for artificial turf |
| Standard Woven | Low to zero | Driveway stabilization (Not for turf) |
Woven weed barriers trap moisture and will ruin your yard’s drainage system.
We see skipping this hidden layer as the second most common corner cut in budget installations. The long-term damage of mixing soil and gravel is completely irreversible without tearing up the entire lawn. A proper layer protects your investment.
Step 4: Edge restraints
We secure the entire perimeter to ensure the sub-base materials never spill outward. Plastic, aluminum, or composite paver edge restraints contain the base and the turf. This step is crucial where the lawn meets a patio edge, a planting bed, or a hardscape transition.
Our team often utilizes premium brands like WonderEdge or heavy-duty Bender Board for residential yards. Proper restraints stop the grass edge from rolling up and creating a tripping hazard. Nailing the perimeter directly into bare dirt without a hard border will lead to immediate base erosion.
- WonderEdge: Speeds up installation and hides the cut edges cleanly.
- Bender Board: Offers flexibility for creating curved, natural-looking garden beds.
- Concrete Pavers: Provides the strongest rigid border for high-traffic zones.
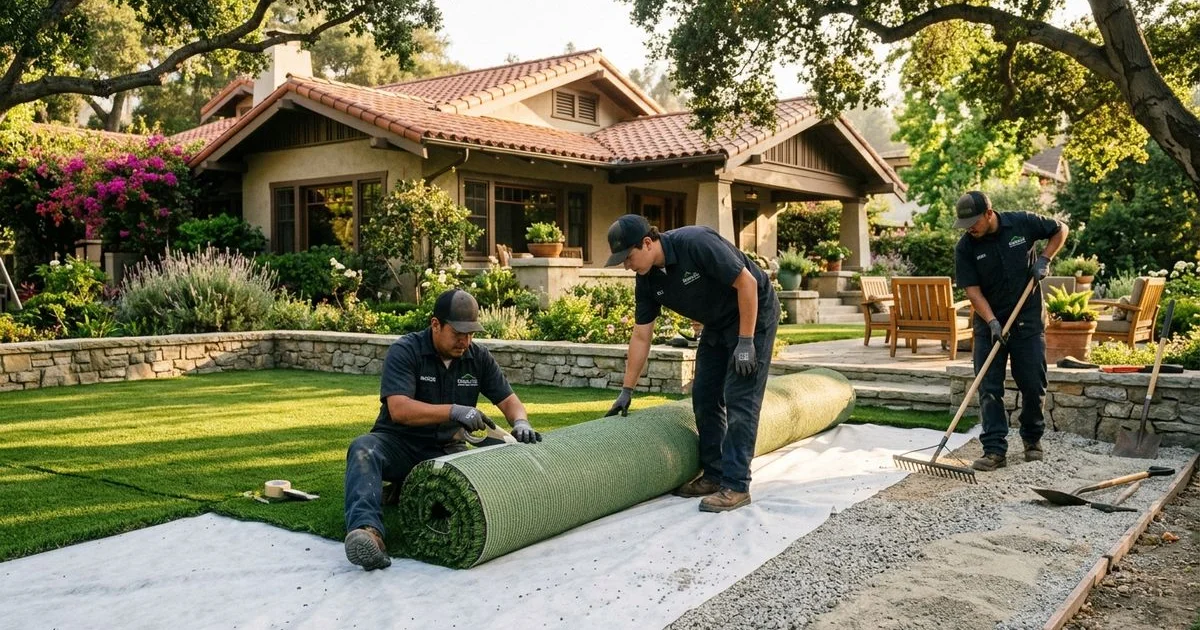
Step 5: Turf layout and seaming
We unroll the material and let it rest in the sun for an hour to relax the backing. The turf rolls typically arrive in 12-foot or 15-foot widths. Yards larger than the roll width require seams joined with commercial seam tape and heavy-duty polyurethane adhesive like Turfbond.
Our installers align the grain carefully so the blades face the primary viewing angle, usually your back patio.
Common Pitfall: Failing to let the turf acclimate in the sun before cutting leads to thermal expansion wrinkles after the adhesive dries.
Quality seam work is completely invisible to the naked eye. Bad seam work shows as a glaring line where the blade direction abruptly shifts.
We strongly advise investing in a premium product featuring TenCate yarn or a comparable real fiber blend. These premium lines carry a 15-year UV warranty and hold their color through brutal summer heat. Top-tier yarns hold their texture beautifully for the full lifespan of the installation.
Step 6: Infill
Our final installation layer involves distributing a specialized infill deep into the synthetic grass. Brushed-in infill stands the fibers up and weights the heavy turf down. It provides vital pet odor control, drainage, and heat reduction depending on your specific choice.
- Silica sand: The cheapest option for basic weighting and fiber stand-up.
- Antimicrobial pet-safe infill: A mineral-based choice like ZeoFill for households with dogs that traps ammonia odors.
- Cooling infill: Options like T°Cool or HydroChill reduce surface temperature by 30 to 50°F in full-sun California installs through evaporative moisture release.
- Rubber crumb: Used historically but much less common now due to high heat retention.
We calibrate our drop spreaders to match the exact manufacturer specification for volume. Most residential applications require 1.5 to 2.5 lbs of infill per square foot to achieve the proper feel and performance. Exact volume depends on the pile height of your chosen grass.
Step 7: Brush, trim, and walk-through
We run a mechanical power broom, such as a Stihl Yard Boss, over the entire yard. This heavy brushing forces the infill to the bottom and stands the grass fibers straight up. The installers then trim the outer edges flush against the restraints for a clean finish.
Our supervisors always conduct a detailed final walk-through with the homeowner to inspect the following items:
- Verify all seams are completely invisible from the main viewing angle.
- Check that perimeter edges are tucked tight and secure against the border.
- Confirm the infill is distributed evenly with no low spots.
A comprehensive written workmanship warranty should be layered on top of the manufacturer’s UV warranty. This closes the project and secures your investment for the long run. Professional installation gives you true peace of mind.
Realistic timeline
Our scheduling team maps out clear expectations for how long your yard will be under construction. Excavation and turf base prep typically consume the majority of the working hours. A heavy clay soil removal might add a full day to these estimates.
| Project size | Days on site |
|---|---|
| 200 to 500 sq ft simple yard | 2 days |
| 500 to 1,500 sq ft including base prep | 3 to 4 days |
| 1,500+ sq ft with putting green | 5 to 7 days |
What separates premium from cheap
We want you to evaluate every contractor bid using the specific details covered above. Low bids almost always disguise hidden shortcuts in the foundation layers. The difference in longevity between a cheap install and a premium system is heavily documented.
- Base depth and compaction: The single biggest factor for longevity.
- Geotextile presence: Prevents soil mixing.
- Edge restraint quality: Keeps the borders sharp.
- Seam discipline: Ensures a realistic, uniform appearance.
- Product UV rating and warranty: Protects against color fading.
- Infill choice matched to use: Manages heat and pet odors.
If you are still mapping out your project, our guide on artificial Turf vs Sod vs Drought Landscape for LA Yards covers a related angle that pairs well with this topic.
Our team applies this exact discipline behind Ridgeline’s artificial turf installation service on every project. Proper installation ensures the surface outlasts the manufacturer’s warranty. Contact us today to upgrade your home with a beautiful, drought-tolerant lawn that saves thousands of gallons of water each year.
Frequently Asked Questions
How long does turf installation take?
Do I need a permit?
Can it be installed over an old lawn?
Have questions about a project of your own?
A free on-site consultation, a phased budget tier, and a master plan that fits your property and your goals.